Liz

Liz

Sunday, August 21, 2011

Cone Nebula Quilt - Editing

When I had the Cone Nebula quilt laid out on the grass last June, I saw this weird polygon:
Today, I put on the ironing board and started auditioning fixes. Here's a close-up of the problem:
Here are several different auditions of possible fixes:


I ended up redoing two blocks and not swapping in the pink/orange piece at the lower right. Here is the final view of the polygon:
I think it looks softer, more organic, and less angular.

Speaking of softer, when I overdyed the backing for the quilt last weekend, I also dyed a jersey dress in the leftover dye. This was a prepared-for-dyeing dress I purchased from Dharma Trading this summer. I spent all week looking at this dress, trying to decide if I liked it:
I had a friend stop over on Saturday, and she talked about how good the color looked with my hair, etc. She did suggest that I dress it up a bit, and after auditioning several different neck treatments, I ended up with this:
Here's a close-up:
I had a piece of pink silk cording that I threaded into a piece of lace. I opened the shoulder seams of the dress and sewed the threaded lace into the seams. I then sewed the lace on to the neckline, right next to the binding. I'm looking forward to wearing this dress.

Finally, the requisite picture of the Brat Cat, this one of her looking cute while requesting cuddles:
This is a creature who would never draw blood from a dearly loved human.... yeah, until the day after this picture got taken!

Sunday, August 14, 2011

Cone Nebula Quilt - Back

A month ago on the big summer dyeing day, I dyed the backing fabric for the Cone Nebula quilt. It came out very bright:
I did a lot of thought experiments, consulted with a friend who is an experienced dyer, and then poked around on a couple of websites before deciding that overdyeing it with a basic blue would fix the brightness without muddying the results too much. My friend suggested Prochem's Mixing Blue, which I did not have on hand. I had Dharma Trading's Strong Navy and Royal Blue on hand. I mixed about a two-to-one ratio of the dyes and diluted quite a bit. Once I poured the dye mixture on, I was terrified it was too dark, but I was too nervous to do anything about it.

Today, I washed out the back, ran it through the dryer, and Hubby and I laid it out on the roof of the shed, and then we both said, "Oh, yeah. That's what we want." Here are a couple of beauty shots:
This toned down the glaring colors, deepened the darker areas, and left a great many bright areas. It is much more in keeping with the front of the Cone Nebula quilt.

Also, today, I cut apart my favorite screenprinting project, auditioned fabrics for the sashing, and put together a small wall hanging for my office.
I picked the dark green (which was one of the fabrics I was given on my retreat in Ohio in June!) after consulting with Hubby. I then did a really crappy job of the quilting, trimming, and binding. Oh well.
Maybe people will be so dazzled by the pretty screenprints, no one will notice the weird edges. If anyone asks, they're artistic touches!

CORRECTION: In the cold light of morning, I came to my senses and realized that I need to take the binding off, fix the weird trimming by adding another border, and otherwise fixing this up. I do like the piece, but it needs some work.

Monday, August 8, 2011

Projects Moving Forward

In my last post I mentioned that I really enjoyed my three-day weekend of workshops last week. In previous years, I have come home from that weekend with several projects half started. This year, I took a techniques class called Spontaneous Screenprinting. It was taught by Debra Gash, a truly dedicated teacher who puts in many hours of preparation prior to each class. I walked out of the class with color on just four pieces of fabric but a head stuffed with a great deal of information for future projects. Here are some pictures.
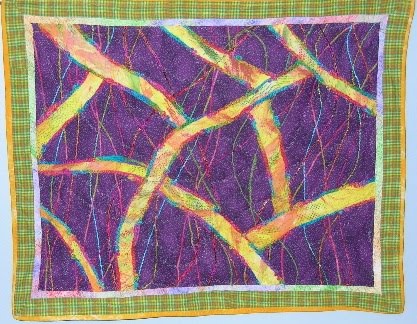
The upper picture is fabric paint pushed through a lacy fabric. The lower picture uses thickened dyes and a piece of linoleum pressed onto the same tableau as that used for the next print:
In other words, I made the blue prints, then put a bunch of yellow dye onto a piece of linoleum and pressed it onto the same pieces of foam, etc. I really want to turn those four blue/green screens into a wallhanging, and I'll probably incorporate those three yellow polygons as well.

Before I digressed into pictures, I was going to tell you that my Saturday class, "Design for Me," was also taught by Debra Gash. There were six students, and the seven of us sat around a table and worked through various exercises together looking at lines, shapes, symmetry, colors, values, tones, etc. We looked at what we like, what we don't like, what we'd like to work on. Our homework for the class had been very interesting in that we were supposed to find pictures of quilts we love, quilts we loathe, and quilts we've made. We sat together as a class at lunch and had some wonderful conversation. By the end of the day, when we started pulling out our groups of pictures, we had established a great deal of trust, and we'd learned each other's preferences so well that if we'd had to, I think we could each have picked out the makers of the various quilts. Two of the classmates are good friends of mine, one classmate talked about how I had given her a pep talk a couple of years ago, and I do plan to follow up with yet another classmate who I think will become a friend. You might check in on Ginia's blog in the next few days for other reflections on this class.

The third day of workshops had actual projects involved. I finished the basic project in the fabric collage postcards class and mentioned this last week. In the afternoon class, I got this far on the tablerunner:
See that cool bias strip doing curlicues in the middle of the piece? Deb Grifka showed us a couple of neato shortcuts for that. Her model tablerunner had some basic shapes appliqued to the runner, but I'm not inspired by stars and triangles, so here is what I did this afternoon:
Yeah, what can I say? I'm a hearts and flowers and butterflies kind of gal. I had a flower stamp and a heart stamp that I used all over, and then I filled out the runner with fused-on shapes that I cut free form. (If you cut two hearts freeform and cut them kind of short and then you put the pointy ends together, you get butterflies. I know. Every eight-year-old girl knows this, but I had forgotten.)

The sewing room redo continues apace. This weekend I made new curtains for it and got my rulers up on the wall. I arranged them so that the rulers I use most often are in the handiest position.
The cats have been exploring the space, and I want to apologize for not getting the picture that presented itself just 10 seconds earlier than this one; all I could see of the Brat Cat was her increasingly wide rear end, but I couldn't grab the camera in time. Here she is on the new fabric hutch.
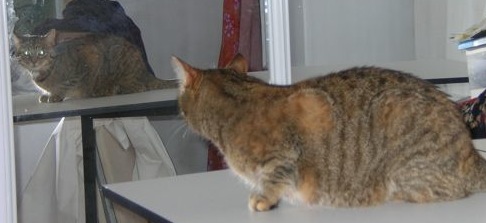
Another new space is the now-mobile table that is sometimes folded up and sometimes out. The Princess is clearly wondering about the monster kitty.

Wednesday, August 3, 2011

Completed Projects!!

I just checked on Ravelry, and I cast on the Every Way Wrap on December 31. Last evening, August 2, I put in the final stitch. Here it is:

I took lots of pictures where I was wearing it, but the flash overwhelmed them. I am very pleased with this project. It seemed as though it would take forever, but I stuck to it. I still have to put buttons on, but pish-tosh!

I had some very good workshops during the recent weekend. If you would like to see pictures of actual sewing projects I accomplished, please see Kat's blog (my postcards are the bottom photo) and Deb's blog. It was a long weekend, and I was doing a lot of stuff besides being in classes.

I'll have pictures from the screenprinting class later in the week.