Liz

Liz

Sunday, December 5, 2010

The Tuffet by Myra Mitchell

There is a particular holiday coming in three weeks, and I decided to make a present for my hubby dearest. A year ago in the summer when we were in North Carolina to visit his folks, we stopped at a nice little shop called Thimble Pleasures in Chapel Hill. I had heard about the shop on Annie Smith's podcast. This is a very nice shop, and it's well worth the visit. While there, I looked for a footstool pattern that Annie had mentioned. When I showed it to Hubby, he said that it would be a very nice addition to our home. "The Tuffet" pattern has been hanging over my sewing table ever since, with occasional questions from Hubby about when we would get a new footstool. This past summer, when we were in the Upper Peninsula, he found some nice flannels that he really liked.

This weekend, Hubby was at a church thing all day Saturday, so I took advantage of the time. Now, he is a large man, so I went in a different direction than the directions indicate. I bought a foot stool at Pier One and a piece of round wood at a home improvement store. Look at the nice fit:
Here's a close-up of the stool:
At work on Friday, I had consulted with the building manager and one of her staff members about how to attach the board and the stool. The three of us talked things over and came up with this idea:
I am married to a computer guy, so I knew we had these in the house. I secured the board and the stool to each other, marked the board, and drilled some holes:

Here are two views of the board, newly stained and with the zip ties in.


Then, using a bread knife, I cut the foam, using a circle template. From this point forward, I pretty much stuck with the instructions in the pattern (which you could get from Thimble Pleasures and probably at your local quilt shop as well).
I traced out the foundation pattern on to eight pieces of muslin. You could use up to 64 pieces of fabric in the tuffet, but I had three fabrics. I went for a walk and mulled over how to approach the problem. I realized that I could make my pieces different sizes. I decided that each foundation would have a single-sized piece of light fabric, a double-sized piece of dark fabric, a single-sized piece of light, and a quadruple-sized piece of the bright fabric. 1+2+1+4=8 Here is one of the marked foundation pieces:
Here are the fabrics in the correct proportions:
I did the piecing onto the foundations:


Here is the button for the top of the tuffet. It's from a coconut shell, and I lucked into it at my local big-box fabric store.

I forgot to take pictures of the stuffing and stapling processes. Here is what the end result looks like:


Here is the final product:
I really liked working with this pattern. It is well written and easy to understand. You will want to read the instructions carefully before purchasing your supplies and definitely before beginning the task. I like the finished project, and I hope Hubby Dearest likes it, too.

Finally, because no post on this blog would be complete without a cat picture, here is the Brat Cat scarfing down the remains of the peanut butter granola on which I snacked during the sewing time - because if it's available, it's hers.

Wednesday, December 1, 2010

Work in Progress Wednesday - #17

I am hoping this is a quick post. I'm running late this morning, for some reason. This post is part of a ring of posts, the rest of which can be found on Tami's website. Do go and check out all of the cool projects people are working on!

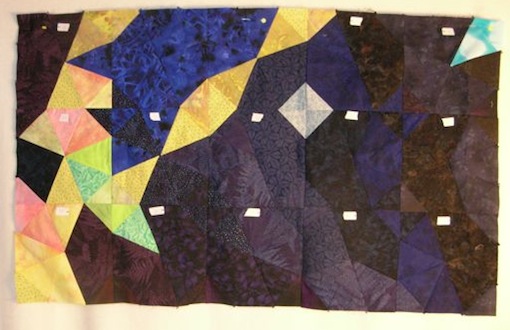
First up, I showed this in my Monday post, but here is the second section of the Cone Nebula quilt, all sewn together. This section fits next to the first section. This coming week, I'll be working on the next section down from the first section. Yes, I need to get a shot of the sections next to each other. I'll do that next week. I promise.
I have been working along on the Haiku baby jacket for my great nephew. This jacket is knit side-to-side, starting at one front lapel, working around the back, and finishing at the other side lapel. In this shot, you'll see that I am on the final third of the back. (The sleeves are knit separately.)
(I pinned the jacket to the design wall in the sewing room. The little yellow dots are the heads of the flat flower pins.) I ran into a situation with the back shoulder where I had an odd number of stitches. Now, a good knitter would have carefully reread the pattern, tinked back to the mistake, and reknit. Nope. Not me. I worked with the odd stitch for a while, decided I had probably doubled up stitches at some point and merrily added another stitch. Then, a couple of days after discovering the error, actually re-read the pattern, etc. At that point, I thought, "Baby jacket, cute design, pretty color, no other knitters in the family," and I just threw in a random decrease in each of the next two rows. So, that shoulder is a little off..... oops!

Last week, I said that I had just started reading The Pillars of the Earth. Judy commented on the soft-porn aspect of the book. I read the entire book over the course of the Thanksgiving Day weekend, finishing late on Saturday afternoon. Here is my summary:

The heart of the book is a description of the challenges of financing and constructing a large building filled with light and air in an era of stonework and with machines powered by muscle and water. Lots of attention is paid to the sources of the materials, the details of how the construction was done, much peering over the shoulder of the master builders as they confronted various problems with load bearing, wind resistance, mortar quality, labor relations, etc.

There are also a lot of pages devoted to discussion of the political scene in England in the 12th century (the century between the Norman Conquest and Magna Carta), with glimpses of the personalities of the major players and the maneuverings of a lot of the minor players. Admittedly, this is fictionalized, but the era and its politics (both secular and religious) are brought to vivid life.

There is a lot of description of how people made money, produced crops, conducted commerce, entertained themselves (with their clothes on), and organized their society. Because one of the characters travels, we see some of French society as well as Spanish society at the height of the Moorish reign.


I should also warn the sensitive reader of the following:
Rapes and/or attempted rapes: 5 (all described in lavish detail)
violent deaths lavishly described: 7-10 immediately come to mind
Non-violent sex scenes, also lavishly described: perhaps a half dozen

Is this one of the best books I've ever read? No, not even close. Is it engaging and interesting and worth reading? I think so, especially if British history and the Middle Ages are of interest to you.

For my book club, I've started reading Little Bee by Chris Cleaves. I'm not very far in. I'll report next week.
Monday, November 29, 2010

Cone Nebula Quilt - Part 3

I have completed the second section of the quilt, and I thought I would show you how I sew together a block so that I keep all of the pieces in order. This is especially critical in a quilt where there is not a regular pattern to the blocks. In other quilts I've made with the kaleidoscope block, I've only used three colors, and it's been easy to keep track of where I am. With this complicated design, I've had to get very systematic. So, I lay out a section of 15 blocks.

(This is seen from the right end of the section.) I use a specialty ruler to cut out the pieces. (The ruler is two floors away from this computer, and I'm not running upstairs to get the brand name. Any quilt shop or big-box craft store with a selection of rulers will probably offer these rulers.)

I start off by going through and sewing all of the corner triangles onto the long triangles.
Then I lay the solo triangles on top of its neighboring dual triangle.
I stack those in order and take them to the sewing machine.
I sew the pairs together and press the seams open. (I press most of my seams open, not to one side or other. This make for flatter seams, and it's easier for me to line up the seams when sewing units together.)
Then I sew together the pairs of triangles.
When I have two sets of pieces,
I sew the final seam in the block.

Then I start at the upper left of the section and sew together one block at a time, going row by row. I sew the blocks together as I complete them and sew the rows together as I sew them. Here is the second section, all sewn together.


As I was working yesterday afternoon, I was not the only one working in the sewing room. The Brat Cat, when she wasn't walking around on the table, moving my pieces around, was primping.
Meanwhile, Hubby Dearest and Princess Kitty were cuddling.
Here is a shot of the craftwork done by the kitties in the house (note the upper right corner of this picture) as well as the princess getting some extra attention from her favorite fellow.
Finally, this weekend, I made the family's fruitcakes. My mother started making fruitcakes in the mid-1960s, and when she died seven years ago, as the oldest daughter, I picked up the banner and am carrying it forward. Here's a shot of the prep (it took about three hours from the time I walked into the kitchen until the cakes went in the oven).
Here are some of the fruitcakes (if my sister sees this, please note that I used the "atomic" cherries; you and your daughter can stop hyperventilating about whether I'm ruining the family's Christmas).
Really, finally, here's Baby Boy being cute - which is what he does best.

Wednesday, November 24, 2010

Work in Progress Wednesday - #16

As I say every Wednesday, this is part of a ring sponsored by Tami, and she has lots of talented people taking part in this weekly check-in of crafty progress.

I want to start off by responding to a very interesting comment I got last week from Urban Exile (and if you haven't discovered her non-crafty blog, please be sure to read it; she has a lot of other interesting things to say).

No, Liz, I could not see you had started on the back. The abstract form I see before my eyes does not say jacket to me at all, and that only increases my admiration of your ability to hold the abstract concept of the jacket in your mind as you slowly construct it, knot-by-knot. Amazing.
After I read this comment, I dashed upstairs, held up the jacket-in-progress, and recited the comment to my non-crafting husband, who said, "She's right. I see you sitting there with a ball of yarn, two sticks, and a set of directions. As you work, I know that you can see a little boy wearing a jacket. I'm also amazed." When I took two steps back from these remarks, I could see the very odd enterprise in which we are engaged. We are challenging the manufactured, mass-produced world around us and going about the business of individualized, customized creation. We are taking pictures in our heads, simple materials, and many hours of our time, and bringing forth items that would not otherwise exist.
Folks, we need to keep crafting not just to produce objects (heck, I could walk into a random big-box store and pick up and pay for a cute jacket for my great-nephew in the time it's taking me to write this blog entry), but to keep these crafts alive. We need to keep this knowledge fresh in the culture in which we live. Those of us who have the need to make things and to learn how to make things perform a valuable service to the culture. We remind the culture of its roots and its possibilities.

I LOVE this commercial. The craft matters.

Here is the current progress on the jacket:
I haven't made a tremendous amount of progress, partly because I have just started reading Ken Follett's The Pillars of the Earth. I have a dear friend who shares my taste in literature, and she thrust the book into my hands a few weeks ago and said, "READ this." So, I'm reading it. I haven't gotten very far in, but I'm hoping to make good progress this weekend. (No, I do not intend to see the mini-series.) Anyway, it's hard to read a big thick book and knit and cuddle kitties (I'm getting good at two out of three at a time).

I spent all of Sunday afternoon (really my only available extended sewing time) working on the Cone Nebula quilt. First up, here is the sewn-together first section!
Next is the long view of the laid-out second section. This seemed to take a very long time because even though I have a lot of fabric cut up, I kept running into the situation of not having the RIGHT piece of fabric. Arrgghh!!
Those bright dark blues in the picture do not look anywhere near that bright in person. Very interesting what the camera does. The little white stickers are the tracking numbers for the blocks. I am easily confused and learned a long time ago to mark as I go. The stickers have letters and numbers indicating placement, and the stickers show which patch is at the top of the block and the orientation of the block.

Have a good week everyone. Those of you in the U.S., I hope you have a nice Thanksgiving.

Wednesday, November 17, 2010

Work in Progress Wednesday - #15

This is Wednesday, so be sure to check out all of the fun projects being shown in WIPW on Tami's blog. I check out most of the projects each week and find them interesting, inspirational, and colorful. Thank you, Tami, for hosting this!

I spent a lot of would-be knitting time this past week reading Brick Lane by Monica Ali. I will say that for a middle-aged Michigan woman who has spent most of her life in a mainstream middle American lifestyle, this book was a real stretch. I simply could not understand the passivity, the acceptance of fate, and the obedience the Bangladeshi women in this book exhibited. At some point, around page 100, I had a talk with myself along the lines of "this book isn't about you; it's about someone else; either slip into her life and see the world from her eyes or put the book aside." I really had to let go of huge parts of myself in order to read this book. Once I began to "see the world from her eyes," though, I realized that I was on a wondrous journey into a very different place than I ever could have imagined. I'm glad I read this book, and I know that I need to seek out other books like it. Parts of the book take place in the immigrant community in London, parts in Dhaka, Bangladesh. The characters are well rounded and believable (once you let go of your own cultural assumptions).

Anyway, I did get some knitting done! (And, that's why you came here today, I know.) Here is the jacket so far. You can see that I have started on the back.
There is a small group of women who gather several times a year and have a sewing-talking-eating day together. We are getting together the day after Thanksgiving, and I think I'll work on the jacket that day rather than take a sewing project.

I finished warping the loom this weekend and, yesterday morning while waiting for the dryer to get the towels just a little dryer, I started on the weft. Here is a beauty shot of the warped loom. (Yes, while hanging out near the washer and dryer, I'm adding fabric to the loom - maximizing that waiting time.)
If you peeked in at my Monday post, you saw the progress on the Cone Nebula quilt. If you didn't, here's a big picture of the work so far.
Well, that's all I have this week. I do want to say that it was a little disconcerting to watch the news coverage of the Big Engagement last evening because I remember getting up at some gosh-awful hour like 3a to watch Prince WAPL's* parents get married. It was the summer I graduated from college, and I took the day off from job hunting to sit with my sisters (one had just graduated from high school, and the other was half-way through high school), all of us in our pajamas deep into the morning, utterly fascinated by the whole thing. Diana was our contemporary and someone to whom we could relate. It was fun seeing her son last night. Life is funny, isn't it?

*William Arthur Philip Louis - one of the local newscasters in Detroit gave him this nickname at birth.

Monday, November 15, 2010

Cone Nebula Quilt - Part 2

I had some extended time this weekend to work on the Cone Nebula Quilt. I have decided to work in chunks of 15 blocks - 5 across and 3 down - mainly because that fits nicely on my worktable and gives me room at one end to cut more pieces. I found that as I worked, I needed to cut additional pieces of some fabrics and go hunting for additional fabrics. As you will see in the pictures below, I have taken to heart the fact that I paid for both sides of the fabric. I have found this trick to be a quick way to get additional shading - pay attention to the green fabric that has leaves on it.
I am making use of commercially printed fabrics, fabrics that I have dyed, and fabrics that I have painted. The dark yellow fabric with squiggly light yellow lines is from a soy-wax batik class I took a year ago in the summer. Once I had laid out the bright fabrics for the 15 blocks, it was time to lay down the dark fabrics. I decided to lay down single-piece-wide "lanes" so that there would be some movement and variation within the darker sections.
I think that adds some subtle changes. Here's the big picture view from the end of the table.
Looking at this picture, the bright orange pieces really stick out, but when I go back to the source picture, there are very bright areas, and I really don't want this to be single-value quilt.

You may wonder why I am laying this out on the table and not on the design wall. The brutal fact is that my design wall doesn't hold individual pieces of fabric very well. It's great when I have blocks that I am arranging and holding up with pins, but when I'm working with small pieces of fabric, the table simply makes more sense to me.

Here are the first three blocks done and sewn together:
I am planning to quilt-as-I-go with these sections - I'll sew together the 15 blocks, then add batting and backing, quilt, then move on to the next section. It's a little nervy - it's assuming that I won't want to change any fabric placement, and I may hold off on the sandwiching and quilting until I have all of the large pieces done. I'm still thinking about that.

I have a practical issue to deal with in that the sewing room is not used as a sewing room every day. Most of the week, it's a cat snooze spot. So, to protect my work, I laid some pieces of cardboard over the layout....

 Then, I put a large piece of cloth over that....

Then, I piled the uncut fabrics for the quilt on that....
And, finally, put a blanket over all of that - creating a snuggly cat bed....
In the end, I recognize who is in charge of the "sewing" room....
Have a good day, everyone.